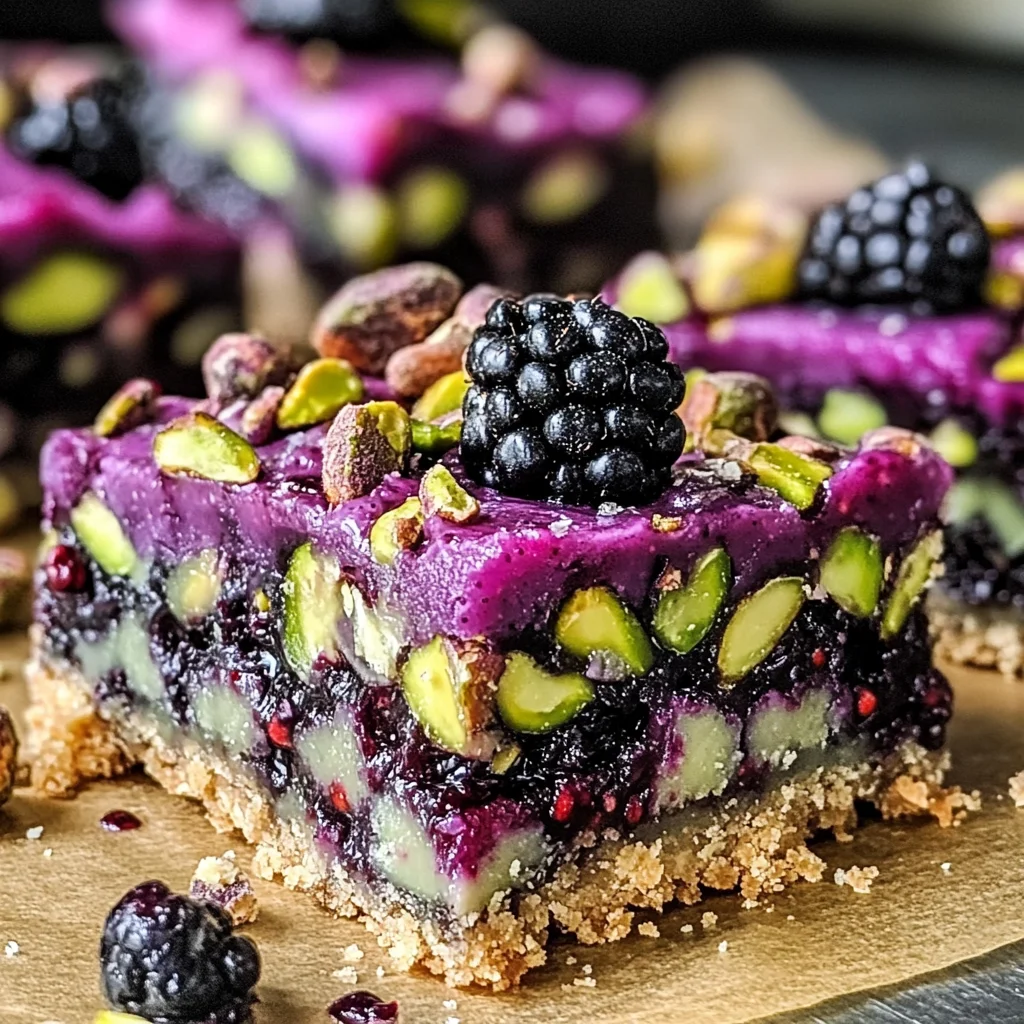
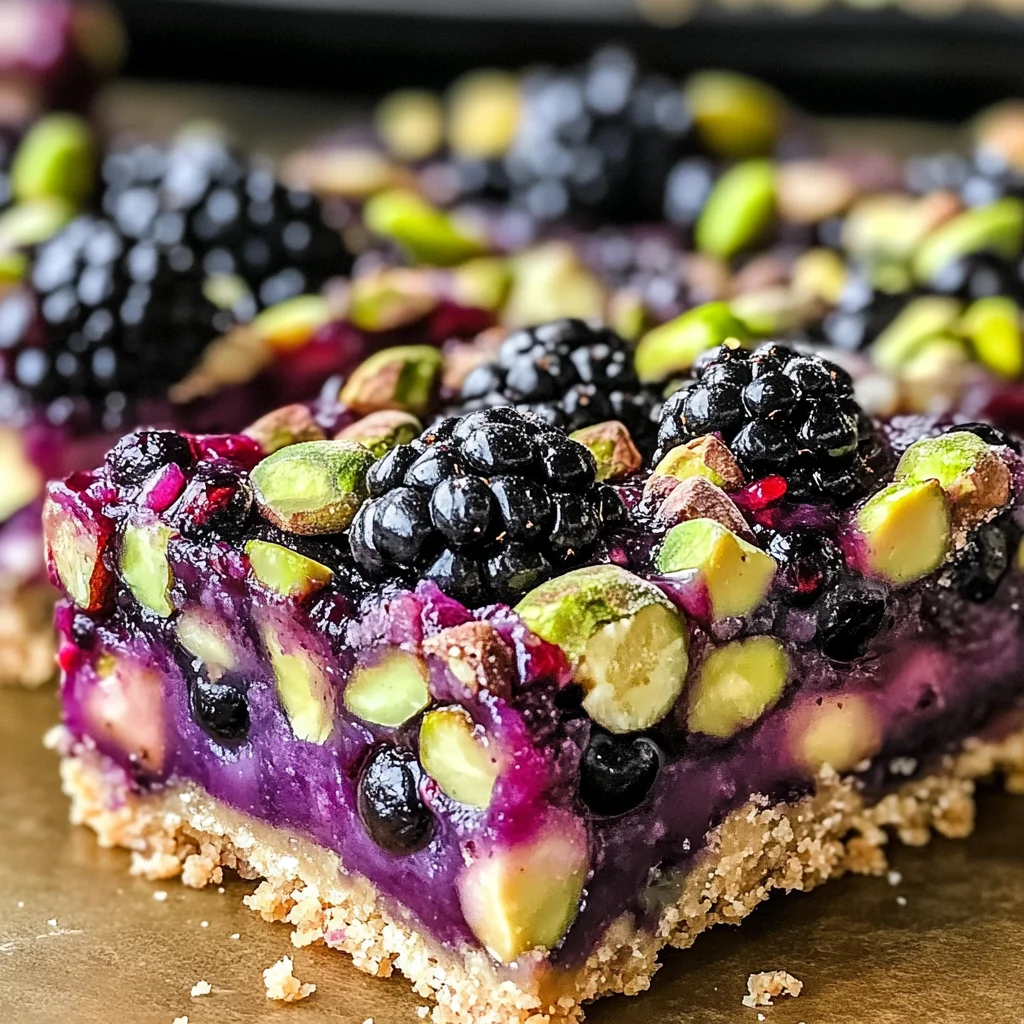
Blackberry Pistachio Dream Bars
Blackberry Pistachio Dream Bars are a delightful treat that brings together the sweetness of fresh blackberries and the crunch of pistachios. These bars are perfect for any occasion, whether you’re hosting a gathering or enjoying a cozy night in. Their unique combination of flavors and textures makes them a standout dessert that will impress friends and family alike.
Why You’ll Love This Recipe
- Easy to Make: With just a few simple steps, you can whip up these delicious bars in no time.
- Flavorful Combination: The sweet blackberries paired with the nutty crunch of pistachios create an unforgettable taste experience.
- Versatile Dessert: Perfect for parties, potlucks, or as a sweet snack at home; these bars fit every occasion.
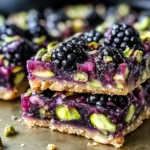
- Eye-Catching Appearance: The vibrant colors of the blackberries and pistachios make these bars visually appealing.
- Customizable Options: Feel free to substitute pistachios with other nuts like walnuts or almonds for a personal twist.
Tools and Preparation
To make your Blackberry Pistachio Dream Bars, having the right tools on hand will make the process smoother. Here’s what you’ll need:
Essential Tools and Equipment
- Baking dish
- Mixing bowls
- Whisk
- Rubber spatula
- Measuring cups
Importance of Each Tool
- Baking dish: Ensures even cooking and proper setting of your bars.
- Mixing bowls: Allows for easy mixing of ingredients without mess.
- Whisk: Helps achieve a fluffy texture when beating eggs and sugar together.
- Rubber spatula: Perfect for folding in delicate ingredients like blackberries.
Ingredients
For the Base
- 1 cup unsalted butter (melted)
- 1 cup granulated sugar
- 2 cups all-purpose flour
For the Filling
- 2 cups fresh blackberries
- 1 cup chopped pistachios
- 2 large eggs
How to Make Blackberry Pistachio Dream Bars
Step 1: Preheat the Oven
Preheat your oven to 350°F (175°C) and grease your baking dish to prevent sticking.
Step 2: Prepare the Crust
In a bowl, mix melted butter, sugar, and flour until crumbly. Press this mixture into the bottom of your prepared baking dish evenly.
Step 3: Make the Filling
In another bowl, whisk together eggs and sugar until fluffy. Gently fold in fresh blackberries and chopped pistachios until well combined.
Step 4: Combine Layers
Pour the blackberry filling over the prepared crust in your baking dish. Spread it evenly to ensure every bite is flavorful.
Step 5: Bake the Bars
Bake in your preheated oven for 25-30 minutes or until set. Keep an eye on them as baking times can vary slightly.
Step 6: Cool and Serve
Allow the bars to cool completely before cutting them into squares for serving. Chilling them for at least an hour helps achieve cleaner slices. Enjoy your Blackberry Pistachio Dream Bars!
How to Serve Blackberry Pistachio Dream Bars
Blackberry Pistachio Dream Bars are a delightful treat that can be served in various ways to enhance their appeal. Here are some serving suggestions that will elevate your dessert experience.
With Fresh Whipped Cream
- A dollop of freshly whipped cream adds a light and airy texture, complementing the richness of the bars.
On a Bed of Berries
- Serve the bars atop a mix of fresh berries for an extra burst of flavor and a beautiful presentation.
Accompanied by Vanilla Ice Cream
- Vanilla ice cream provides a creamy contrast to the tart blackberries, creating a perfect balance of flavors.
Drizzled with Honey or Maple Syrup
- A drizzle of honey or maple syrup enhances the sweetness and adds a lovely gloss to each bar.
Garnished with Mint Leaves
- Fresh mint leaves not only add a pop of color but also bring a refreshing element to the dessert.
How to Perfect Blackberry Pistachio Dream Bars
To ensure your Blackberry Pistachio Dream Bars turn out perfectly every time, consider these helpful tips.
- Use Fresh Blackberries: Choose ripe, fresh blackberries for optimal flavor; frozen ones may introduce excess moisture.
- Chill Before Cutting: Allow the bars to cool completely and chill for at least an hour before slicing for cleaner edges.
- Adjust Sweetness: Taste your filling before baking; you can adjust the sugar according to your preference.
- Substitute Nuts: Feel free to swap pistachios for walnuts or almonds if you want a different nutty flavor.
- Store Properly: Keep leftover bars in an airtight container in the fridge for up to 5 days for freshness.
Best Side Dishes for Blackberry Pistachio Dream Bars
Pairing your Blackberry Pistachio Dream Bars with complementary side dishes can create a well-rounded dessert experience. Here are some excellent options:
- Fresh Fruit Salad: A mix of seasonal fruits adds color and freshness, enhancing the overall presentation.
- Cheese Platter: A selection of mild cheeses pairs beautifully with the sweetness of the bars.
- Chocolate Sauce: Rich chocolate sauce drizzled over the bars creates an indulgent treat that chocolate lovers will adore.
- Yogurt Parfait: Layered yogurt with granola and additional berries makes for a delightful accompaniment that balances sweetness.
- Coffee or Tea: A warm cup of coffee or tea complements the flavors while providing a cozy touch.
- Citrus Sorbet: Refreshing citrus sorbet cleanses the palate between bites and offers a zesty contrast to the sweet bars.
- Pecan Pie Bites: Mini pecan pie bites provide another layer of flavor while keeping with the dessert theme.
- Caramel Sauce: Drizzling caramel sauce adds richness and enhances the sweet-tart profile of the bars.
Common Mistakes to Avoid
Making Blackberry Pistachio Dream Bars can be simple, but a few common mistakes can lead to disappointing results.
- Using Frozen Blackberries – Frozen blackberries have excess moisture that can make your bars soggy. Always opt for fresh blackberries for the best flavor and texture.
- Overmixing the Batter – Overmixing can lead to tough bars. Mix just until combined to keep your bars light and tender.
- Skipping the Cooling Time – Cutting into warm bars can result in messy squares. Allow your bars to cool completely before slicing for clean edges.
- Neglecting to Grease the Dish – Not greasing the baking dish may cause your bars to stick, making them hard to remove. Always grease or line the dish with parchment paper.
- Ignoring Measurements – Accurate measurements are crucial for baking success. Use a kitchen scale or measuring cups for precise amounts.
Storage & Reheating Instructions
Refrigerator Storage
- Shelf Life: Store in the refrigerator for up to 5 days.
- Container: Keep in an airtight container to maintain freshness.
Freezing Blackberry Pistachio Dream Bars
- Freezer Duration: These bars can be frozen for up to 3 months.
- Storage Method: Wrap individual bars in plastic wrap, then place them in a freezer-safe container.
Reheating Blackberry Pistachio Dream Bars
- Oven – Preheat your oven to 350°F (175°C) and warm the bars for about 10 minutes.
- Microwave – Heat individual squares on high for 15-20 seconds until warm.
- Stovetop – Place on a pan over low heat, covering with a lid until warmed through.
Frequently Asked Questions
Here are some frequently asked questions about making Blackberry Pistachio Dream Bars.
Can I use other nuts instead of pistachios?
Yes! You can substitute pistachios with walnuts or almonds for different flavors and textures.
How do I know when my bars are done baking?
The edges should be set and lightly golden, while the center may still have a slight jiggle; it will firm as it cools.
Can I make these bars vegan?
To make them vegan, replace eggs with flaxseed meal mixed with water or another egg substitute suitable for baking.
What is the best way to serve Blackberry Pistachio Dream Bars?
These bars are delicious on their own or served with a scoop of vanilla ice cream or whipped cream on top.
Final Thoughts
Blackberry Pistachio Dream Bars are a delightful treat that combines sweet and nutty flavors. They are perfect for any occasion, whether it’s a gathering or a quiet evening at home. Feel free to customize these bars by trying different nuts or adding spices like cinnamon for an extra kick. Enjoy making this versatile dessert!
Blackberry Pistachio Dream Bars
Experience a burst of delightful flavors with Blackberry Pistachio Dream Bars. These scrumptious dessert bars perfectly blend the natural sweetness of fresh blackberries with the rich crunch of pistachios, making them an ideal treat for any occasion. Whether you’re hosting a party or enjoying a quiet evening at home, these bars will impress your guests and satisfy your sweet cravings. Easy to make and visually appealing, they are customizable to suit your taste preferences. Try these bars today for a refreshing dessert that everyone will love!
- Prep Time: 15 minutes
- Cook Time: 30 minutes
- Total Time: 45 minutes
- Yield: Approximately 12 servings 1x
- Category: Dessert
- Method: Baking
- Cuisine: American
Ingredients
- 1 cup unsalted butter (melted)
- 1 cup granulated sugar
- 2 cups all-purpose flour
- 2 cups fresh blackberries
- 1 cup chopped pistachios
- 2 large eggs
Instructions
- Preheat the oven to 350°F (175°C) and grease a baking dish.
- In a bowl, combine melted butter, sugar, and flour until crumbly. Press into the bottom of the prepared dish.
- In another bowl, whisk eggs and sugar until fluffy. Fold in blackberries and pistachios.
- Pour filling over the crust and spread evenly.
- Bake for 25-30 minutes until set.
- Allow to cool completely before cutting into squares.
Nutrition
- Serving Size: 1 serving
- Calories: 230
- Sugar: 13g
- Sodium: 80mg
- Fat: 13g
- Saturated Fat: 8g
- Unsaturated Fat: 4g
- Trans Fat: 0g
- Carbohydrates: 24g
- Fiber: 2g
- Protein: 3g
- Cholesterol: 70mg